As my daughters and I decorated our 10-minute St. Valentine heart-shaped bags made out of paper plates, I realized that I hadn’t emphasized the Catholic nature of this feast day in the design of the craft. Images of the Sacred and Immaculate Hearts swirled in my head. I knew there was also one for St. Joseph, but, being less popular, I was not familiar with it. Ultimately, I didn’t have the time or materials I needed to complete St. Joseph’s Most Chaste Heart, but you can read my how-to instructions for the others below.
The Sacred Heart
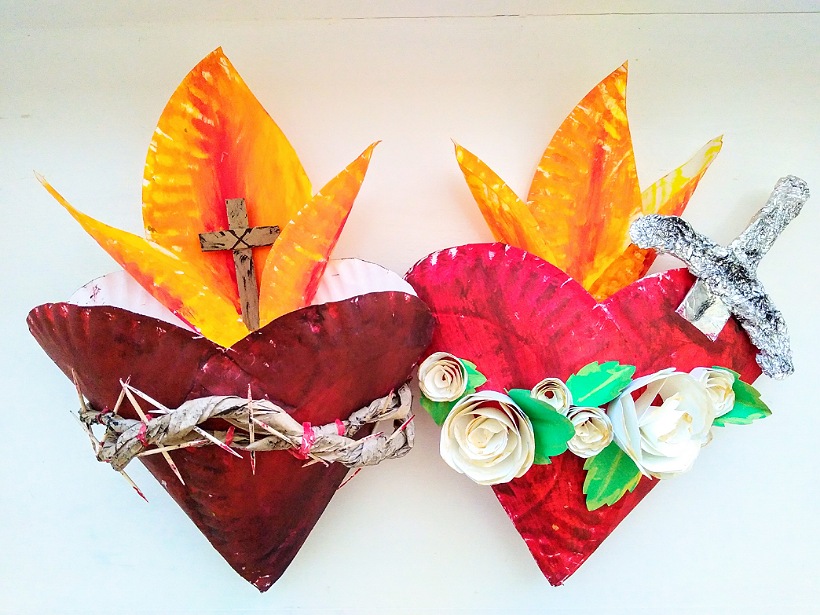
To first understand what the Sacred Heart is, you can read this article from EWTN. To craft it, we’ll:
- Start with our heart-shaped paper plate bag.
- Paint it red. A dear friend and former art teacher once told me that she never paints with just one color. I used two different reds and some black for mine.
- Create a crown of thorns. My husband knows to save me the brown packing paper that shows up in Amazon boxes. It’s free, durable, and generally plenty long and wide. I cut off a strip about 3′ long and 3.5″ wide. Then, I twisted it very tightly so it would retain the twisting.
- Secure the crown of thorns to the bag. I also save twist ties, so I used these to secure the crown of thorns in place. I poked two holes about a 1/4″ apart with an awl in three different locations on the front, and three more on the back. From the outside of the heart bag, I ran the twist ties through one hole at a time. I placed my twisted paper in between the holes, and ran the other end of the twist tie through the remaining hole. Then, I twist tied it inside the bag.
- Add the thorns. Using an awl and toothpicks, I poked all the way through my twisted paper at different angles. Sometimes, just pushing the toothpick through did the trick, but where the paper was twisted in a thicker bunch, the awl was required.
- Paint the crown of thorns. To match the style of the heart painting, I dabbed a tiny bit of black paint on my brush and lightly stroked across the crown of thorns. I added red to the ends of each toothpick as well.
- Create the flame. Using one more paper plate, I cut out three flame shapes of various sizes. Two, I folded in half to give them more depth. I stapled all three together at the bottom and painted them in red, orange, and yellow.
- Make the cross. The one pictured here is chipboard. Cereal boxes and the backs of notebooks and notepads are fantastic sources for free chipboard. Cut two rectangles, glue them together, and add some detail like the x that’s meant to look like they’re lashed together and the black paint I used to match the style of the rest of it.
- Hot glue the flame and cross in place.
The Immaculate Heart
Devotion to the Immaculate heart began with the apparitions of Our Lady in Fatima. To read more about the promises Mary made, try this article from EWTN. To craft it, we’ll:
- Start with our heart-shaped paper plate bag.
- Paint it red. Just like above, I used two different reds and some black for mine.
- Add roses and leaves. The roses and leaves pictured are made of cardstock cut on a Cricut. You can use this file, a free one I found long ago and adapted for a baby shower wreath, to get the shapes you’ll need. Or, you can make a spiral cut on paper. It won’t be quite as polished, but it will still work. You can also grab some fake flower and skip the whole cutting, rolling, and gluing process. Rolling these up is the most difficult part. I rolled the first few petals tightly and secured it with glue on the small ones, then continued rolling and glued the end in place. On the larger ones, I rolled the whole thing on a pencil, then tightened up the center once the pencil was removed. I used tacky glue to secure them in place. The leaves were added after the roses, and I cut off excess leaf each time I determined the placement I wanted.
- Paint the roses and leaves. I wanted the roses to remain white as a symbol of Mary’s purity, but I wanted to match the style of the heart and add depth to the adornment. I chose gold paint, and just kissed the edges of the roses and leaves with my brush.
- Create the flame. Copying the exact flame from the heart above, I cut out three flame shapes of various sizes from a paper plate. Two, I folded in half to give them more depth. I stapled all three together at the bottom and painted them in red, orange, and yellow.
- Hot glue the flame in place.
- Make the sword: Using chipboard, I free-handed a sword hilt and top portion of the blade. I bend the blade part in half slightly to create that groove. Then, I covered the whole thing in foil. I brushed on a little black paint for a finishing touch.
- Secure the sword in place. With an exacto knife, I sliced one straight line just slightly larger than the sword blade. I inserted the bottom of the blade into the slit and taped it in place inside the heart bag.